WHAT'S NEW?
Loading...

Change font style at runtime in Visual Basic.Net


Visual Basic.Net not only provides control properties at design time but also at runtime. Moreover, the user will frequently modify the control properties at runtime where they can change what it looks like. For instance, changing the font style in textbox, more often users didn’t compatible in default font style you made it. Instead, the users can select font style they like. So, in this sample source code can help you to figure out how to use font style at run-time with combo box and textbox in vb.net where the users are free to select their own style. Code is really simple!

 Dim cbselect As Integer = ComboBox1.SelectedIndex

        Select Case cbselect
            Case 0
                TextBox1.Font = New Font(TextBox1.Font, FontStyle.Regular)
            Case 1
                TextBox1.Font = New Font(TextBox1.Font, FontStyle.Bold)
            Case 2
                TextBox1.Font = New Font(TextBox1.Font, FontStyle.Italic)
            Case 3
                TextBox1.Font = New Font(TextBox1.Font, FontStyle.Strikeout)
            Case 4
                TextBox1.Font = New Font(TextBox1.Font, FontStyle.Underline)
        End Select

To try this code, you need Combobox and Textbox. After you drag combobox to your windows form, make sure to edit combobox items and add Regular, Bold, Italic, Strikeout, and Underline in every new line where the users can select font style when the program is running.
Copy and paste this one to your combobox Edit Items or in the properties window, locate the property Items and click (Collection)…

Regular
Bold
Italic
Strikeout
Underline

Once it finished, try to type in textbox and made some selection in combobox to see what will happen. That’s all, hopefully you appreciate it.

How to create picture viewer in Visual Basic.Net

To create picture viewer in Visual Basic.Net is very simple with a less amount of code. In addition, any pictures in your computer can be browse and will display on your Windows Form Application. Unfortunately, it only covers how to browse picture in a local computer, once the program close, the picture you browse that display in your Windows Form will be lose. For instance, use database to stored data if you prefer the consistency so that every time to load your program, the data will remain once the program is running and it will be loaded automatically on your Forms. After working on this tutorial, the output should like the following example screenshot.

Picture Viewer in Visual Basic.Net
What we need to work with in order to create a simple picture viewer are 1 button, OpenFileDialog, and PictureBox that can be found on your toolbox controls.

Name the Button as follows:
Property       value
Name                    btnSelectPicture
Text                       Browse Picture

Name the OpenFileDialog as follows:
Property       value
Name                    ofPictureFileDialog
Filename             make it empty
Filter                     JPEG Files|*.JPG
Title                       Browse Picture

Name the PictureBox as follows:
Property       value
Name                    pictureBoxViewer
BorderStyle        FixedSingle
SizeMode            StretchImage

Note: every time you change the property value of each controls make sure you to select it.

Source code: Just simply copy and paste on your button.

Private Sub btnSelectPictures_Click(sender As System.Object, e As System.EventArgs) Handles btnSelectPictures.Click

        If ofPictureFileDialog.ShowDialog = Windows.Forms.DialogResult.OK Then
            pictureBoxViewer.Image = Image.FromFile(ofPictureFileDialog.FileName)
            Me.Text = "Picture Viewer(" & ofPictureFileDialog.FileName & ") "
        End If

End Sub
Me.Text = "Picture Viewer(" & ofPictureFileDialog.FileName & ") “'show the path name of a file where the file was based in the form’s caption.

Create a simple calculator in Visual Basic.Net


It’s more fun to create simple application in VB.Net with less amount of code. Just simply drag and drop controls. Since, Visual Basic.Net provides features where you can create quick application in a minute. In this tutorial, I’ll show you how to create simple calculator in Visual Basic.Net. Unfortunately, it only covers very simple calculation with four arithmetic operators such as Addition, Subtraction, Multiplication, and Division.

Here is the sample screenshot.
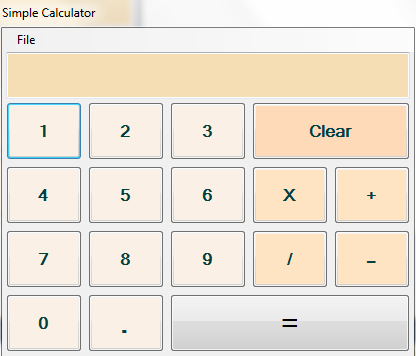
Simple Calculator in Visual Basic.Net
Source code:

Option Explicit On
Public Class frmcalculator
    Dim number1 As Single
    Dim number2 As Single
    Dim answer As Single
    Dim arithmeticoperator As String

    Private Sub btn1_Click(sender As System.Object, e As System.EventArgs) Handles btn1.Click
        If txtdisplaynumber.Text = "0" Then
            txtdisplaynumber.Text = "1"
        Else
            txtdisplaynumber.Text = txtdisplaynumber.Text & "1"
        End If
    End Sub

    Private Sub btn2_Click(sender As System.Object, e As System.EventArgs) Handles btn2.Click
        If txtdisplaynumber.Text = "0" Then
            txtdisplaynumber.Text = "2"
        Else
            txtdisplaynumber.Text = txtdisplaynumber.Text & "2"
        End If
    End Sub

    Private Sub btn3_Click(sender As System.Object, e As System.EventArgs) Handles btn3.Click
        If txtdisplaynumber.Text = "0" Then
            txtdisplaynumber.Text = "3"
        Else
            txtdisplaynumber.Text = txtdisplaynumber.Text & "3"
        End If
    End Sub

    Private Sub btn4_Click(sender As System.Object, e As System.EventArgs) Handles btn4.Click
        If txtdisplaynumber.Text = "0" Then
            txtdisplaynumber.Text = "4"
        Else
            txtdisplaynumber.Text = txtdisplaynumber.Text & "4"
        End If
    End Sub

    Private Sub btn5_Click(sender As System.Object, e As System.EventArgs) Handles btn5.Click
        If txtdisplaynumber.Text = "0" Then
            txtdisplaynumber.Text = "5"
        Else
            txtdisplaynumber.Text = txtdisplaynumber.Text & "5"
        End If
    End Sub

    Private Sub btn6_Click(sender As System.Object, e As System.EventArgs) Handles btn6.Click
        If txtdisplaynumber.Text = "0" Then
            txtdisplaynumber.Text = "6"
        Else
            txtdisplaynumber.Text = txtdisplaynumber.Text & "6"
        End If
    End Sub

    Private Sub btn7_Click(sender As System.Object, e As System.EventArgs) Handles btn7.Click
        If txtdisplaynumber.Text = "0" Then
            txtdisplaynumber.Text = "7"
        Else
            txtdisplaynumber.Text = txtdisplaynumber.Text & "7"
        End If
    End Sub

    Private Sub btn8_Click(sender As System.Object, e As System.EventArgs) Handles btn8.Click
        If txtdisplaynumber.Text = "0" Then
            txtdisplaynumber.Text = "8"
        Else
            txtdisplaynumber.Text = txtdisplaynumber.Text & "8"
        End If
    End Sub

    Private Sub btn9_Click(sender As System.Object, e As System.EventArgs) Handles btn9.Click
        If txtdisplaynumber.Text = "0" Then
            txtdisplaynumber.Text = "9"
        Else
            txtdisplaynumber.Text = txtdisplaynumber.Text & "9"
        End If
    End Sub

    Private Sub btn0_Click(sender As System.Object, e As System.EventArgs) Handles btn0.Click
        If txtdisplaynumber.Text = "0" Then
            txtdisplaynumber.Text = "0"
        Else
            txtdisplaynumber.Text = txtdisplaynumber.Text & "0"
        End If
    End Sub

    Private Sub Button14_Click(sender As System.Object, e As System.EventArgs) Handles Button14.Click
        txtdisplaynumber.Text = txtdisplaynumber.Text & "."
    End Sub

    Private Sub btnplus_Click(sender As System.Object, e As System.EventArgs) Handles btnplus.Click
        number1 = Val(txtdisplaynumber.Text)
        txtdisplaynumber.Text = "0"
        arithmeticoperator = "+"

    End Sub

    Private Sub btnx_Click(sender As System.Object, e As System.EventArgs) Handles btnx.Click
        number1 = Val(txtdisplaynumber.Text)
        txtdisplaynumber.Text = "0"
        arithmeticoperator = "x"
    End Sub

    Private Sub btndivide_Click(sender As System.Object, e As System.EventArgs) Handles btndivide.Click
        number1 = Val(txtdisplaynumber.Text)
        txtdisplaynumber.Text = "0"
        arithmeticoperator = "/"
    End Sub

    Private Sub btnminus_Click(sender As System.Object, e As System.EventArgs) Handles btnminus.Click
        number1 = Val(txtdisplaynumber.Text)
        txtdisplaynumber.Text = "0"
        arithmeticoperator = "-"
    End Sub

    Private Sub btnequals_Click(sender As System.Object, e As System.EventArgs) Handles btnequals.Click
        number2 = Val(txtdisplaynumber.Text)
        'Addition
        If arithmeticoperator = "+" Then
            answer = number1 + number2
        End If
        'Subtraction
        If arithmeticoperator = "-" Then
            answer = number1 - number2
        End If
        'Multiplication
        If arithmeticoperator = "x" Then
            answer = number1 * number2
        End If
        'Division
        If arithmeticoperator = "/" Then
            answer = number1 / number2
        End If
        'Result
        txtdisplaynumber.Text = answer
    End Sub

    Private Sub btnclear_Click(sender As System.Object, e As System.EventArgs) Handles btnclear.Click
        txtdisplaynumber.Text = "0" 'Enable to clear
    End Sub

    Private Sub ExitToolStripMenuItem_Click(sender As System.Object, e As System.EventArgs) Handles ExitToolStripMenuItem.Click
        Me.Close()
    End Sub
End Class


Visual Basic quick search command


Visual Basic.Net provides features where you can automatically connect from your database source and query data in a simple way. In addition, you can query data directly from your database in various commands, such as adding, deleting, updating, and quick searching of record. Furthermore, a lot of controls can work with in querying a data in Visual Basic.Net with a less amount of code because of the .Net Framework provided. Fortunately, in this tutorial shows how to search record in Visual Basic.Net in a quick method. 

Here is the video in quick search command.


Source code:


Private Sub Form1_Load(sender As System.Object, e As System.EventArgs) Handles MyBase.Load
        'TODO: This line of code loads data into the 'DbInfoDataSet.tblinfo' table. You can      move, or remove it, as needed.
        'Me.TblinfoTableAdapter.Fill(Me.DbInfoDataSet.tblinfo)
End Sub

Private Sub btnsearch_Click(sender As System.Object, e As System.EventArgs) Handles btnsearch.Click
      'move the code to txtsearch
End Sub

Private Sub txtsearch_TextChanged(sender As System.Object, e As System.EventArgs) Handles txtsearch.TextChanged

    Dim search As String = "%" + txtsearch.Text + "%"

    Me.TblinfoTableAdapter.FillBySearchName(Me.DbInfoDataSet.tblinfo, search, search)
End Sub

Total the sum in DataGridView


In general, there’s a various way how to sum the total in DataGridView. In fact, they use different approach but the results generate the same output. It depend the programmer or developer how they are going to use. In this example, I used databinding approach to sum the total in DataGridView using for loop statement in Visual Basic.Net (VB.NET). Also you may apply this in any Visual Studio Languages such as C#, ASP.Net, WPF, and etc. as long the DataGridView available in toolbox. However, the source code I provided here not necessarily the same when you apply to other languages. In addition, make some modification if you are going to use to other languages. Here is the sample source code to sum the total in DataGridView using VB.NET.

 For i = 0 To Me.TblStudentPaymentDataGridView.RowCount - 1
            sum += Me.TblStudentPaymentDataGridView.Rows(i).Cells(0).Value.ToString()
           
            Me.TblStudentPaymentBindingSource.Current.item("TotalPaid") = sum
        Next

If you quite familiar in databinding approach, I think it’s difficult to understand what does code stand for and what output will be generated.

Me.TblStudentPaymentDataGridView.RowCount, a code generated when you drag a certain field from your datasource and all other namespaces that could be use.

RowCount – 1 means all rows will be read but we don’t yet specify which column in rows we are going to sum in DataGridView. To specify the column and sum the total rows, we use Me.TblStudentPaymentDataGridView.Rows(i).Cells(0).Value.ToString().

Don’t forget to use + operator to sum the total rows in DataGridView.

Rows(i) to count all rows in the DataGridView, Cells(0) determine which column field name to sum. Why is it in Cell 0? Consider an array start at index 0, the same in DataGridView or Table in Database, it start from index 0. So, if the column you want to sum the total, use a number index to specify the field name of your DataGrid column and let RowCount sum whatever the number is in your rows.

The total sum we made in DataGridView will be store in Me.TblStudentPaymentBindingSource.Current.item("TotalPaid") = sum. TotalPaid is the name of a column name in DataGrid where our total sum will be store.