WHAT'S NEW?
Loading...

How to use Binding Navigator in VB.NET


If you’re using 
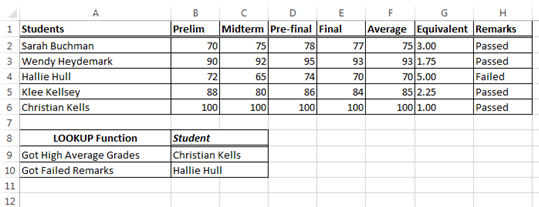
Windows Form DataBinding to bind data to build an application quickly, this approach can do more with a less amount of code compare with traditional approach (unbound). In this tutorial, I’ll show you how to use Binding Navigator to enable to Add, Save, Delete, Update, Retrieve, and Search record 
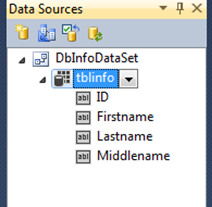
in a simple way in default generated code (see related articles for unbound or traditional approach with ADO.NET as work in the same way). This is an example screenshot of BindingNavigator after the dataset
table’s drag into the Form.
Binding navigator
As you have noticed, it generates a controls where you can navigate data and displays number of rows in a table, enable to add, delete, and save quickly. In addition, BindingNavigator allows you to customize depends how it looks like. As my own opinion, I don’t like to use this control as my default view to add, delete, save, etc. to control my data, instead I use a buttons or icons in every commands. However, if you double click an ADD icon there’s no code available how the code does is. Fortunately, to add new entry the code is simple as this.

Me.TblinfoBindingSource.AddNew(), you can add this line of code in a Form Load while adding new entry so that you if the program start running you don’t need to click add button every time to add new entry. Then, put again this code in Save Button after message box display so that it will clear all textboxes and enable you to add again new entry.

To DELETE icon, the code is:

Me.TblinfoBindingSource.RemoveAt(Me.TblinfoBindingSource.Position)
Me.TblinfoTableAdapter.Update(DbInfoDataSet.tblinfo)
MessageBox.Show("Deleted")

The code for Save and Update works on the same way depends on how to manage the source code.

Me.Validate()
Me.TblinfoBindingSource.EndEdit()
Me.TblinfoTableAdapter.Update(Me.DbInfoDataSet.tblinfo)
MessageBox.Show("New record(s) has been added to the database")

The only difference is the message box show dialog if what message will appear either new records added or records has been successfully updated.

To navigate records without using default binding navigator, the code is simple as this. Just simply add a button |<  <  >  >|.

Move first record
Me.TblinfoBindingSource.MoveFirst()

Move previous record
Me.TblinfoBindingSource.MovePrevious()

Move next record
Me.TblinfoBindingSource.MoveNext()

Move last record
Me.TblinfoBindingSource.MoveLast()

To fill a record, Me.TblinfoTableAdapter.Fill(Me.DbInfoDataSet.tblinfo)can be found in the Form Load. Actually, you can omit this line of code if you wish.

The search record the code is simple as this.

Me.TblinfoBindingSource.Filter = "Lastname LIKE '%" & txtsearch.Text & "%' or Firstname LIKE '%" & txtsearch.Text & "%'"

Here are the sample screenshots:
Add New Entry
Add New Entry
Update records
Update Records
Delete Records
Delete Records
Show Records
Show Records
Quick Search Records
Source can be download hereIf you want to save more files online and share it to your friends, sign up for free.

ByVal and System keywords removed in Visual Basic 2012


If you’re using Visual Basic 2010 then migrate to Visual Basic 2012 when you noticed there’s a lot of changes happening not only the colors and icons but also the code how it will generated. In addition, the first thing that come in your mind as you used VB 2012 and view the source code, the codes become a little compare in previous version of Visual Basic.Net. However, the omitted keywords ByVal and System are optional to use. Here are the example source code in VB2010 and VB2012.

This example is in VB 2010.
Private Sub btnOk_Click(ByVal sender As System.Object, ByVal e As System.EventArgs) Handles btnOk.Click
End Sub

This example is in VB 2012.
Private Sub btnOk_Click(sender As Object, e As EventArgs) Handles btnOk.Click
End Sub

Next, we are going to create Method Name in both version to see the difference. Though, copying the code from VB 2012 to VB 2010 will automatically generates code that compatible with VB 2010. For instance, in VB 2012 were not using ByVal nor System keyword but when you copy and paste it to VB 2010 the code will change automatically with ByVal and System.

VB 2010
Private Sub btnOk_Click(ByVal sender As System.Object, ByVal e As System.EventArgs) Handles btnOk.Click
        MessageBox.Show(add(5, 5))
End Sub
    Private Function add(ByVal x As Integer, ByVal y As Integer)
        Dim a As Integer
        a = x + y
        Return a
End Function

VB 2012
Private Sub btnOk_Click(sender As Object, e As EventArgs) Handles btnOk.Click
        MessageBox.Show(add(5, 5))
End Sub
    Private Function add(x As Integer, y As Integer)
        Dim a As Integer
        a = x + y
        Return a
End Function

I had been created my method name in VB 2012 without using ByVal and System keywords. Moreover, when you copy this code and paste it in any previous version, the code will automatically add ByVal and System keywords.

How Databinding works if in case to make modification on table’s columns?


In Visual Basic.Net Windows Form DataBinding and ADO.NET on how to Setup Connection Wizard to connect database access to bind data from Windows Form Application. Now, let’s take a look how it work as data passes from Windows Form to MS Access Database and how to manage Server Explorer as part of the Data connection where in database was already located.

In this tutorial, I am using VisualStudio 2012 Ultimate, if you’re using previous version is almost identical, only the colors, icons, and other options are not same as VS 2010 because of some changes made. The one I like in VS2012, you’re allow to search windows such as Toolbox, Solution Explorer, Data Source, and other windows if not visible in your default view. If you’re now using VS2012, its looks like old windows but is doesn’t measure that. Indeed, it’s faster and light weight to use compare in previous version.  Fortunately, a lot of features is now available in Visual Studio 2012.

Now, if you had already add Database using Connection Wizard, it will automatically appear your Database file (act as Dataset a local copy of your Database) in a Data Sources Windows, and at the same time on your Solution Explorer it added new objects such as your Database and Database Dataset.

Once it has already added, in Server Explorer Window also added Data Connection from your database, Server Explorer allows you to retrieve data, add, and make some modification of your entry. However, make sure to create a copy of your file to your project’s output directory during Data SourceConfiguration Wizard so that every time you run the program, it will automatically load whatever made changes on your database. Your file can be found on folder bin/Debug/your_database_name. In this option will prompt a message.
Visual Studio Data Connection Wizard
Click Yes. If you click No, the database will remain its path location where it already saved.

Did you try or mistaken not to able to drag and drop your tables or columns name using Server Explorer Window? Actually, you cannot drag because this Server Explorer serves to manage your database connection as part of your database and tables. In Data Sources Windows, you’re allow to drag whatever you want either a table or any columns to choose any of the following Textbox, ComboBox, ListBox, and Label apply on your Form.

This is how it looks your Data Sources and Server Explorer Windows.
Visual Studio Data Sources and Server Explore Windows
In Databinding, sometime it’s hard to analyze and understand where the data passes through. Next, let’s examine how data works if some modification happen in the database tables and make some changes its columns or to add/delete/modify entry. What if I want to make changes my columns name or add another fields in my table, is it possible? This a common mistakes or unseen solution by many beginner’s in VB.Net try to make modification from their tables because they don’t have enough idea to work it. Fortunately, this is how…

Once you run the program, the database file and other object are in a folder name of your project. However, we do have two (2) database file saves on the separated folder. First, is in the Name of your Project Folder and the second one is in your Debug Folder


This is how it looks.
Database in Project folder name
And other one.
Database in Debug folder

Now, you have an idea where the database file was located. This is the magic trick if you want to make some modification on your table’s columns or whatever you want. Do NOT make any changes on your Debug Folder where the Database was located because whatever you made is nothing happen once the program’s start running (F5). If you want to try, open your database in Debug Folder, double click and right click on the table and click Datasheet View to show, and to add some entry or columns. Then close MS Access Database and to try run your program (F5). After run, stop the programming running and try to open again your Database in Debug folder to see what happen if there’s new added data. Nothing happen, right? The current data still unchanged.

Fortunately, if you want to do any modification in your table’s columns or entry, used first Database in the Project Folder Name not in the Debug folder. Try it to assure if it is working or not. Now, whatever changes happen you made in the first database table’s columns or entry is also automatically affected in the Debug folder Database.

The only difference, modification made from Debug folder Database nothing happens and still remain unchanged.

Glimpse the difference between VS 2010 and VS2012


Glimpse the difference between Visual Studio 2012 and VS 2012 development tools. The changes provide the needs of every developer/programmer to create application more quickly and ease of use in developing sophisticated software. Now, in new features of Visual Studio 2012, capability, portability, stability, and a lot more are already in this development tools. Let’s explore and take a look the difference compare in previous VS 2010. Review related articles in Visual Studio 11, the 1st named before it called Visual Studio 2012. VS11 and VS12 are almost identical, but there’s some few changes in VS12. Here are some photos.

Visual Studio Ultimate Version Photos:

Visual Studio 2010 Ultimate
Visual Studio 2012 Ultimate
Let's look the difference between VB10 and VB12 source code:

Visual Basic 2010:
Public Class Form1

    Private Sub Form1_Load(ByVal sender As System.Object, ByVal e As System.EventArgs) Handles MyBase.Load

    End Sub
End Class

Visual Basic 2012:
Public Class Form1

    Private Sub Form1_Load(sender As Object, e As EventArgs) Handles MyBase.Load

    End Sub
End Class


If you had noticed the changes in source code, in VS 2010 it used ByVal but in VS 2012 is optional.

Visual Studio 2010 Menu
Visual Studio 2012 Menu
Visual Studio 2012 MENU

Configure MySQL connection in VB.NET with ADO.NET

Migrate your Microsoft Access Database to MySQL Database?

Visual Basic.Net provides variety of Data Provider to work with ADO.NET depends on the needs of the projects. For instance, to store a large amount of data to your database, it’s prefer to used MySQL, Oracle, and MSSQL because MS Access Database only provides limited features compare other Databases. Fortunately, All Data Providers works on the same way because if you know how to use OLEDB Provider also you can easily work with others.

For example.

OLEDB Class
Dim da As OleDbDataAdapter
Dim cmd As New OleDbCommand
Dim conn As New OleDbConnection

MySQL Class
Dim da As MySqlDataAdapter
Dim cmd As New MySqlCommand
Dim conn As New MySqlConnection

To use MySQL Class name. Right click anywhere in your Toolbox and Choose Items

Add New .Net Components

It will displays dialog window, the default tab is .Net Framework Components. Locate MySqlCommand, MySqlConnection, and MySqlDataAdapter.


Choose Toobox Items Components
Then, click OK.


Now, just above Public Class Form1 import class name Imports MySql.Data.MySqlClient.

To setup the connection string.

connString = "server=localhost;user id=root;password=123;database=dbinfo"

connString a variable name that holds your data provider connection, in server provider you can set localhost as number 127.0.0.1 because were both identical. If you don’t have password, let empty and lastly, your database name.


Your code looks like the following.

Imports MySql.Data.MySqlClient
Public Class Form1
    Dim connString As String
    Dim da As MySqlDataAdapter
    Dim ds As New DataSet
    Dim cmd As New MySqlCommand
    Dim sql As String
    Dim conn As New MySqlConnection

    Private Sub Form1_Load(ByVal sender As System.ObjectByVal e As System.EventArgsHandles MyBase.Load
    End Sub

    Public Sub myConnection()
        connString = "server=localhost;user id=root;password=123;database=dbinfo"
        conn.ConnectionString = connString
        conn.Open()
    End Sub

    Private Sub btnConnect_Click(ByVal sender As System.ObjectByVal e As System.EventArgsHandles btnConnect.Click
        Call myConnection()
        MessageBox.Show("Opened")
        conn.Close()
    End Sub

    Public Sub retrieveData()
        Call myConnection()
        sql = "SELECT * FROM tblInfo"
        da = New MySqlDataAdapter(sql, conn)

        da.Fill(ds, "dbinfo")
        DataGridView1.DataSource = ds.Tables("dbinfo")
        conn.Close()
    End Sub

    Private Sub btnFill_Click(ByVal sender As System.ObjectByVal e As System.EventArgsHandles btnFill.Click
        Call retrieveData()
    End Sub

End Class

The Windows Form Looks like the following.
MySQL and VB.NET Windows Form


Problem in Excel using IF and LOOKUP Function

A list of students with their periodic exam (Prelim, Midterm, Pre – final, and Final) to calculate the average, equivalent, and remarks using excel. This problem it might be use various built-in function in excel such as AVERAGE, IF, and LOOKUP Function. Every Function has special meaning and capability to perform calculation. For instance, to identify whether the student’s Passed or Failed, we need to use IF Function. Now, find out what’s the best solution of this problem.

Given the following table. 
Excel Problem using various  built-in function
Grading System:

Grade                    Equivalent
100                        1.0
97-99                    1.25
94-96                    1.50
91-93                    1.75
88-90                    2.00
85-87                    2.25
82-84                    2.50
79-81                    2.75
75-78                    3.00
<75                        5.00

Requirements:

1.   Compute the Average grade of every student.
2.   Determine the student’s Equivalent grade given the Grading System above and Remarks whether Failed or Passed using IF Function.
3.   Determine the name of a student whose Average is equals to 100 using LOOKUP Function.
4.   Determine the name of a student got Failed Remarks using LOOKUP Function.

Final Output looks like the following
Excel Problem using various  built-in function output

Visual Basic.Net Windows Form Data Binding in ADO.NET


Visual Basic.Net has a capability to bind controls on the Windows Forms easily that almost any structure that contains data through both simple and complex data binding. Simple data binding allows you to bind a control to a single data element. The most common use of simple data binding involves binding a single data element, such as the value of a column in a table, to a control on a form. You use this type of data binding for controls that show only one value. Uses of simple data binding include binding data to text boxes and labels. Complex data binding allows you to bind more than one data element to a control. Using the column example, complex data binding involves binding more than one column or row from the underlying record source. Controls that support complex data binding include data grid controls, combo boxes, and list boxes.

In essence, data binding refers to the process of automatically setting properties of one or more form controls at run time from a structure that contains data. With data binding, you do not need to explicitly write the code that instantiates a connection and creates a dataset (as you would with an unbound approach), instead let the Wizards associated with Windows Forms write the necessary ADO.NET code for you.

Now, let’s work with Data Binding and ADO.NET that instantiates a connection, retrieve data, and stored data in Microsoft Access. To start with, you need to create database name and table name to integrate our program. Open your Microsoft Access, named it DbInfo and tblinfo for your table. Your field name and data type looks like the following.
Microsoft Access Database

 Note: I used Microsoft Access 2013 Preview Version, when you noticed the Data Type instead Text, I used Short Text. However, you may use Long Text, that’s new added features in Access 2013 Data Type. Don’t worry while saving your database because the file extension not vary in your data provider because you’re using data binding that automatically write the necessary code for your connection. Now, right click to view Datasheet View to put data in your columns at least 5 entries. Then closed Access Application, make sure your database name saves in your dedicated drive directory and folder so that to browse our database later it’s easy for them to locate where our database was already located.

Currently, open your Visual Basic.Net, named it Data Binding with Windows Forms and ADO.NET. To configure our connection to database. Locate Data in your menu that it looks like the following.

Add New Data Source

After you click Add New Data Source, new dialog box appear for configuration wizard. Let Database as default selected. Click Next, let Dataset as default selected type of database model, a Dataset file will added to your project. Next, noticed connection wizard appears to choose which data connection should use to connect to the database. Now, click New Connection… button to established new connection
Data source connection
Choose which Data sources needs to establish your connection. In this tutorial, we’re using Microsoft Access as Data Provider for OleDb. After you choos the Data source, Browse your database file name in your computer where it was already saved. To Test Connection, closed Microsoft Access Application first. Then Ok. 

When you expand Connection String it will displays Provider=Microsoft.ACE.OLEDB.12.0;Data Source=C:\Users\Jocode\Documents\DbInfo.accdb.

Moreover, when you click Next, dialog box displays to tell whether your Database file remain saves on its local directory or copy the Database file to your project. 
Save file database options
Click Yes to create a copy of your Database to your project. Click Next to continue until it display.
Database object table
Check all the textboxes and click Finish.

When you click finished nothing happen in your form. However, in your solution explorer when you noticed new object are added the Database name and DataSet. Now, click DbInfo.accdb in your Solution  Explorer and in Properties Window change Copy always to Copy if newer in Copy to Output Directory. 
Visual Basic Solution Explorer
The reason why to choice Copy if newer, if new data will added and save it in the database the data will not lost once the program run again. However, if you forgot to configure this option, every time you add new entry and save it then close the program and try to run again, the new added entry could not display.
To display the result in DataGridView from your database. Click Data and Show Data Sources.
Visual Basic Data source
There’s an option to displays result, either use DataGridView or a Field Name. Now, Drag tblinfo on your Windows Form1. The Form looks like the following.
Windows Form designer
Windows Forms write the necessary ADO.NET components code for you such as your DataSet, BindingSource, TableAdapter, Tablemanager, and BindingNavigator. The final output when you run the program displays like the following.
Windows Form DataGridView
When you double click the form, the following code generates the connectivity from your database. This code was created when you drag tblinfo in your Form.

Private Sub Form1_Load(sender As System.Object, e As System.EventArgs) Handles MyBase.Load
        'TODO: This line of code loads data into the 'DbInfoDataSet.tblinfo' table. You can move, or remove it, as needed.
        Me.TblinfoTableAdapter.Fill(Me.DbInfoDataSet.tblinfo)
End Sub

The binding navigator above shows the number of rows, plus sign icon enables you to add new entry, x icon signifies if you want to delete entry, and save icon to save new entry. In addition, there’s a lot of configuration/modification to work with Data Binding in order your application more controls and manageable, secure, and it looks more professional.