Visual Basic.Net has a capability to bind controls on the Windows
Forms easily that almost any structure that contains data through both simple and complex data binding. Simple data binding allows you to bind a
control to a single data element. The most common use of simple data binding involves binding a single data element, such as
the value of a column in a table, to a control on a form. You use this type of
data binding for controls that show only one value. Uses of simple data binding
include binding data to text boxes
and labels. Complex data binding allows you to bind more than one data element
to a control. Using the column example, complex data binding involves binding
more than one column or row from the underlying record source. Controls that
support complex data binding include data
grid controls, combo boxes, and list boxes.
In essence, data binding refers to the
process of automatically setting properties of one or more form controls at run
time from a structure that contains data. With data binding, you do not need to
explicitly write the code that instantiates a connection and creates a dataset
(as you would with an unbound approach), instead let the Wizards associated
with Windows Forms write the necessary ADO.NET code for you.
Now, let’s work with Data Binding and ADO.NET
that instantiates a connection, retrieve data, and stored data in Microsoft
Access. To start with, you need to create database name and table name to
integrate our program. Open your Microsoft Access, named it DbInfo and tblinfo for your table. Your
field name and data type looks like the following.
Currently, open your
Visual Basic.Net, named it Data Binding with Windows Forms
and ADO.NET. To configure our
connection to database. Locate Data in your menu that it looks like the
following.
After you click Add New Data Source, new dialog box appear for configuration
wizard. Let Database as default
selected. Click Next, let Dataset as default selected type of
database model, a Dataset file will added to your project. Next, noticed connection wizard appears to choose which data
connection should
use
to connect to the database. Now, click New
Connection… button to established new connection
Choose which Data sources needs to
establish your connection. In this tutorial, we’re using Microsoft Access as
Data Provider for OleDb. After you choos the Data source, Browse your database file name in your computer where it was already
saved. To Test Connection, closed Microsoft
Access Application first. Then Ok.
When you expand Connection String it
will displays Provider=Microsoft.ACE.OLEDB.12.0;Data
Source=C:\Users\Jocode\Documents\DbInfo.accdb.
Moreover, when you click Next, dialog box displays to tell whether your Database file remain
saves on its local directory or copy the Database file to your project.
Click Yes
to create a copy of your Database to your project. Click Next to continue until it display.
Check all the textboxes and click Finish.
When you click finished nothing happen
in your form. However, in your solution explorer when you noticed new object
are added the Database name and DataSet. Now, click DbInfo.accdb in your Solution Explorer and in Properties Window change Copy always to Copy if newer in Copy to
Output Directory.
The reason why to choice Copy if
newer, if new data will added and save it in the database the data will not
lost once the program run again. However, if you forgot to configure this
option, every time you add new entry and save it then close the program and try
to run again, the new added entry could not display.
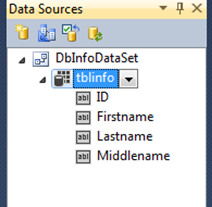
To
display the result in DataGridView
from your database. Click Data and Show Data Sources.
There’s an option to displays result,
either use DataGridView or a Field Name. Now, Drag tblinfo on your Windows Form1. The Form looks like the
following.
Windows Forms write the necessary
ADO.NET components code for you such as your DataSet, BindingSource, TableAdapter,
Tablemanager, and BindingNavigator. The final output when you run the
program
displays like the following.
When you double click the form, the
following code generates the connectivity from your database. This code was
created when you drag tblinfo in your Form.
Private Sub Form1_Load(sender As
System.Object, e As
System.EventArgs) Handles
MyBase.Load
'TODO: This
line of code loads data into the 'DbInfoDataSet.tblinfo' table. You can move,
or remove it, as needed.
Me.TblinfoTableAdapter.Fill(Me.DbInfoDataSet.tblinfo)
End Sub
The binding navigator above shows the
number of rows, plus sign icon enables you to add new entry, x icon signifies
if you want to delete entry, and save icon to save new entry. In addition,
there’s a lot of configuration/modification to work with Data Binding in order
your application more controls and manageable, secure, and it looks more
professional.


.jpg)


0 comments:
Post a Comment